This is my experience in converting and owning a Golden Motor Magic Pie 3 electric bike kit.
Kona hybrid bike conversion
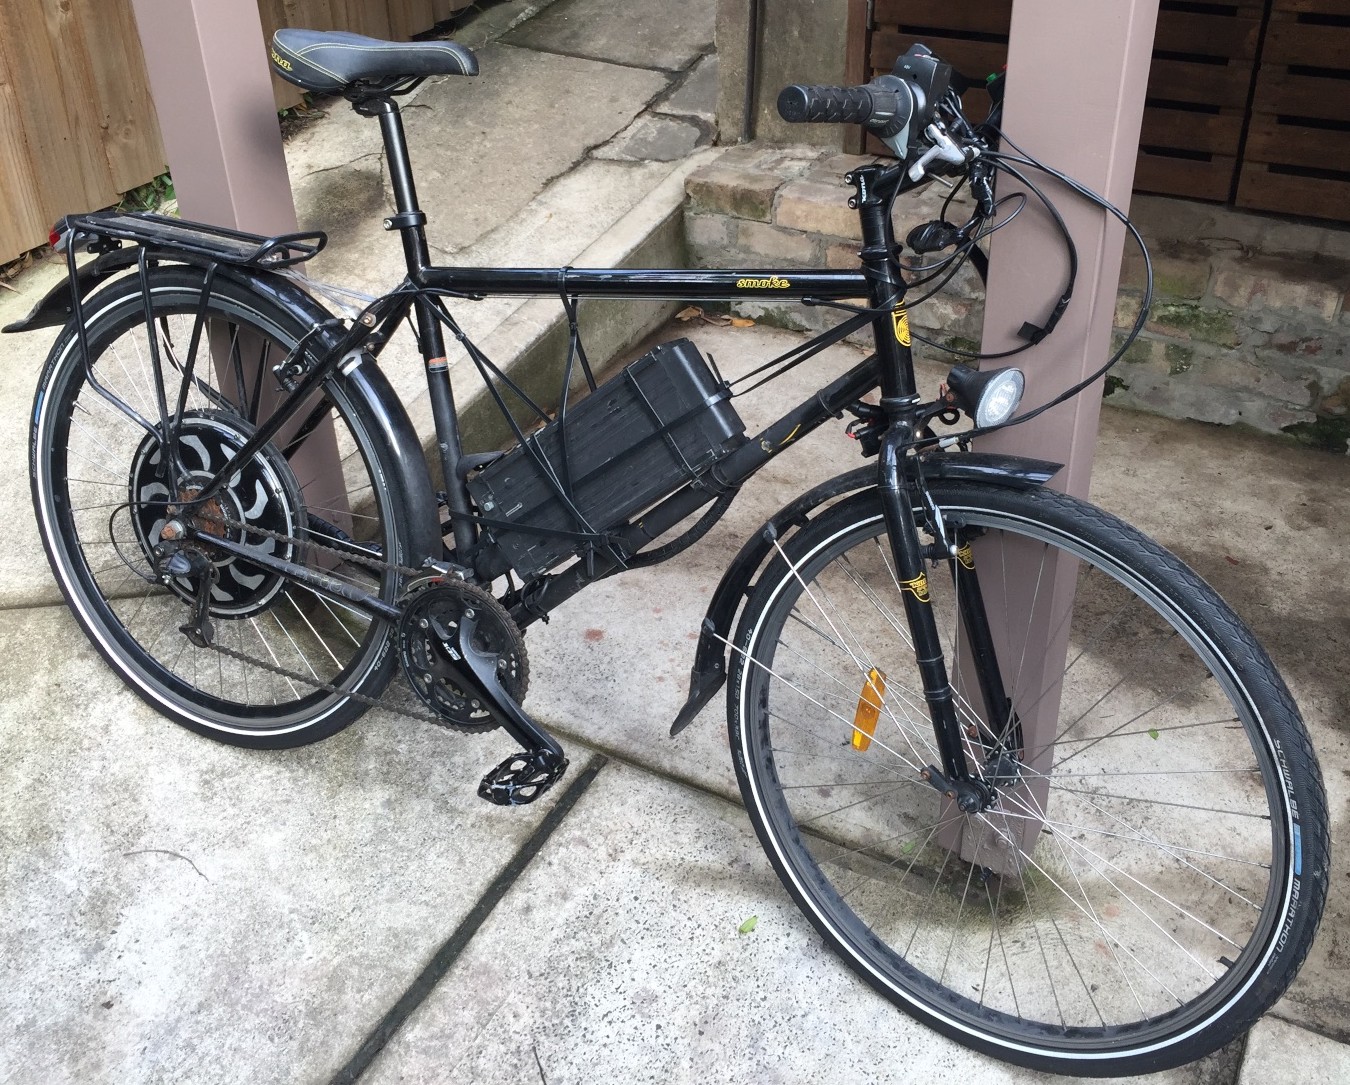
- Bike: Kona Smoke – Steel Frame Hybrid.
- Electric bike kit:
- Golden Motor Magic Pie III kit
- 1000W Rear Hub Motor
- Battery – 48V 10ah
- Extras:
- Torque arms
- Velcro loops to attach cables
- Connectors for lights
- Ortlieb Back-Roller Classic Bicycle Panniers
- Custom made aluminium battery mounting brackets

Why use an electric bike?
I have a regular push bike and I can ride to work. It’s a 30 minute ride and I need to shower before starting work having riden. We don’t have showers and 30 minutes isn’t enough exercise to justify the hassle.
Cool things about electric bike trips:
- It can replace many car trips within the bikes range
- Travel directly from door to door, total travel time can often be the same or less than driving.
- Parking is not a problem – even in the city.
- If it’s cold – pedal more to warm up, if it’s hot – don’t pedal at all.
- Cost per km is around 1/10th that of driving a car.
If you’re thinking about getting an electric bike make sure you also read our electric bike buying guide, our listing of electric bike brands available in Australia and lastly our local electric bike shop listing.
Range
On a 20km commute, no pedalling, with the following elevation profile I’m seeing 10-20% remaining battery capacity corresponding to a range of 22-25kms. I’m a 100 kg rider and the base bike weighs circa 12 kg. Note the profile below shows one direction only – 10kms. The elevation is displayed in feet, distances in Miles.

With light pedalling I’m finding perhaps 10-20% reduction in power use on this route.
A lighter rider and a flatter route will significantly increase range.
Flat battery
It’s important to note that the Golden Motor Magic Pie III has significant resistance, riding the bike once the battery is flat requires significantly more work than simply allowing for the additional weight associated with the hub motor/battery.
Range calculations
I’m averaging around 20Wh/km on the above commute. Using this as a guide you can calculate your required battery capacity.
For example:
- 24V – 16Ah = 384 Ah @ 20Wh/km = 19 kms
- 36V – 12Ah = 432 Ah @ 20Wh/km = 21 kms
- 48V – 10 Ah = 480 Ah @ 20 Wh/km = 24 kms
What size motor?
Getting up hills without working is about maximum power output.
1000W is recommended if you want to climb hills without pedalling.
What is the legal limit?
In Australia the limits are currently 200W. 250W seems more common in other parts of the world. There are moves in Europe to introduce a 1000W power limit with a speed limit of 25km/hr.
Front vs Rear wheel drive
For a higher power electric bike (circa 1000W) which is the focus of this guide a rear mounted motor is recommended.
Front wheel drive
- Suited to lower power (200W) bikes. Propels via the forks rather than the rear a-frame section which less suited to higher loads
- Easier to handle for a novice/intermediate rider
- Simpler setup – electric power on the front wheel, pedal power on the rear wheel
- Suited to battery mount on a rear rack
- Suited to higher power (1000W) bikes
- Ideally requires a forward mounted battery for even weight distribution.
- Won’t loose traction on steep inclines
Speed
On a 28inch/700c wheel the following speeds can be achieved on flat ground:
- 24 V – 20 km/hr
- 36V – 30 km/hr
- 48V 40 km/hr
Wiring
I used double sided velcro loops to attach the wiring loom to the bike. Particularly whilst the bike is new and still being set up wiring will inevitably come on and off, velcro makes this easier than using cable ties.
Lights: Note – be very careful wiring the the front and rear lights supplied with the kit. The negative terminal of the rear light grounds to the frame, reversing the polarity will break one or both of the speed controller and motor controller.
Battery mounting options
The Golden Motor kits provide a rack for mounting the battery. It is easy to assemble and works.
If you’re using a front hub motor mounting the battery on the rear rack should provide for a reasonably even weight distribution.
There are two major problems with using the supplied rack battery mounting kit.
1. Mount point is too high.
The battery sits relatively high on the bike. This means that the center of gravity is high. The side effect is that if you’re manouverying the bike, in and out of a car, walking around obstacles, as soon as the bike leans away from vertical the weight of the battery wants to pull the bike over.
If you lower the mounting point on the battery on the bike you significantly reduce the tendency of the bike to want to fall over. This makes it easier to manage and easier to handle.
Note that this problem is very much about manouvering the bike, when you’re riding it the effect is not so noticeable.
2. All of your weight is over the rear wheel
With a rear hub motor both motor and battery sit rear of the seat. If you need to pick the bike up there are no easy points for lifting on the bike frame behind the top tube. Picking the bike up using the top tube leaves the back wheel firmly on the ground and the front wheel in the air.
Moving the battery forward into the triangle of the frame resolves his problem.
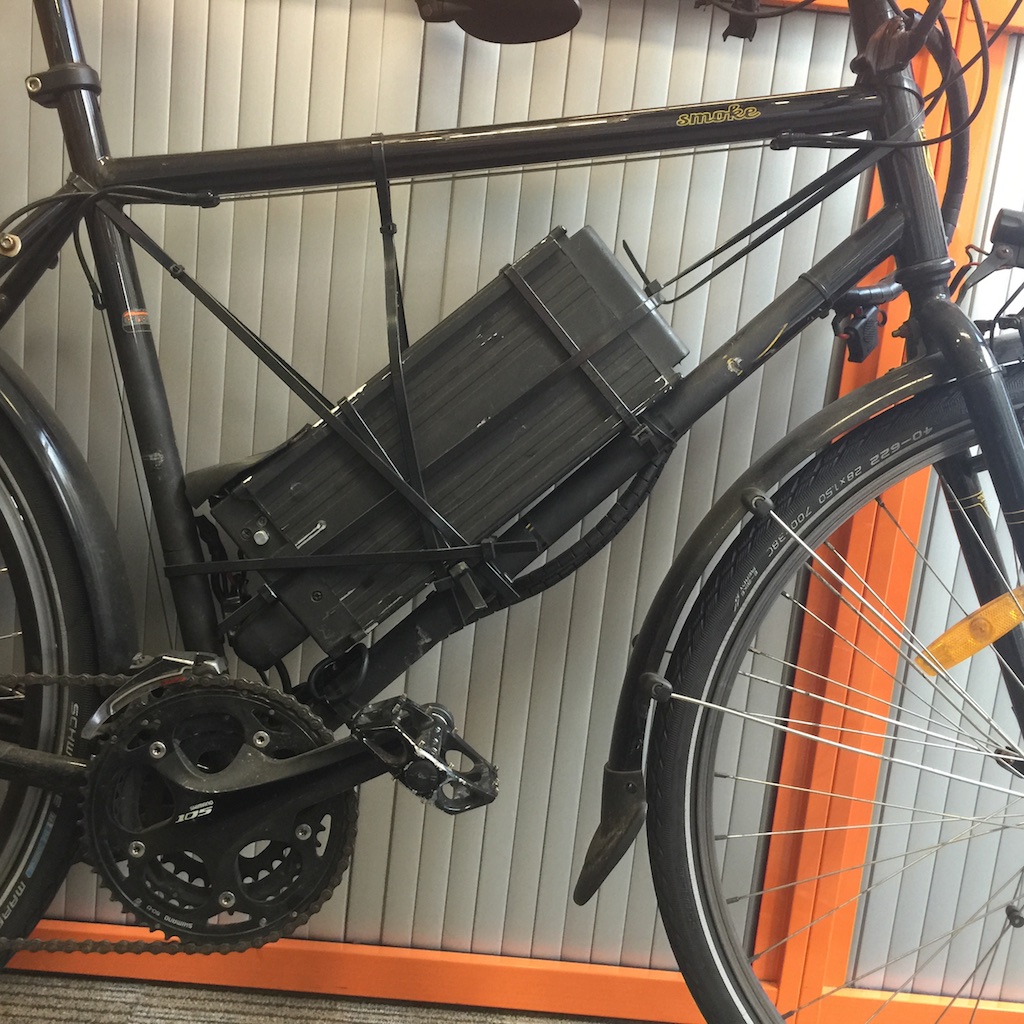
Custom mounting options
I fabricated simple brackets using aluminium. The mount attaches to the drink bottle holder mount points. The battery is secured to the bike – it cannot be removed without tools.


Alternately consider a frame bag. They’re mostly made to order, search for “frame bag” or “bike packing” to find local vendors. Some cool examples:
Puncture protection
The wheel containing the hub motor cannot be quick release. It is also has cabling attached making removal more timely. You simply don’t want to be dealing with punctures on an electric bike so consider a combination of the following:
1. Use a tire puncture sealant goo in your tubes
2. Use puncture resistant tyres
3. Install bicycle tyre liner in your existing tyres (eg Mr Tuffy’s)
4. Diligently maintaining correct tyre pressures
Do I need to pedal my electric bike?
I pedal for two reasons a) it feels awkward not to and b) travelling on a push bike above 20km/hr without pedalling attracts attention which is generally unwanted.
Most importantly a reasonably powerful motor means that any pedalling you do is comparable always being on the flat or slight downhill run. It’s effortless.
Golden motor – direct or reseller
Golden Motor have resellers in many countries and also sell direct online. My experience in dealing direct with them has been very positive. They have been both very responsive and helpful.
In Australia – none of the resellers that I can locate appear to be operating on sufficient scale to provide the same level of service as Golden Motor are able to provide in dealing directly with them – even allowing for language and distance.
Shipments from China to capital city in Australia have been consistently around 4 days from ordering.
Support
Golden Motor have an incredibly amount of community support and some fantastic resellers who publish valuable resources online:
- Golden Motor Forum
- Endless Sphere Forum
- http://www.rev-electricbikekits.com.au/ – Reliable local Australian supplier of Golden Motor Magic Pie components
Golden Motor kit vs factory e-bike
Pro’s
- You can purchase a 1000W motor, most factory e-bikes are limited to 250W
- Cost – circa half the price of purchasing an equivalently powered factory e-bike
- If you like to tinker – you can tinker.
- You need to be handy with bike maintenance to own and operate a Golden Motor setup. If you’re not comfortable with tools, wiring, general bike assembly you’re better of with a factory e-bike
- No local dealer support (if you buy direct) – when something goes wrong you need to diagnose the fault and be part of the fix
- Less integration – factory e-bikes neatly hide wiring within the frame, integrate controls etc.
- Factory built e-bikes use custom frames designed to accomodate the torque that goes through the axel/drop-outs.
Update June 2013
I first setup the bike around March 2012 and the review above was written shortly after. What follows is my experience 12 months on – some things have changed, I’ve learnt a bit and so some parts of this update super-seed the original review.
Reliability:
- The rear wheel/motor unit originally shipped to me had a manufacturing fault. I was able to diagnose it with assistance from end users on the Golden Motor forums. Golden Motor accepted the fault and shipped me a new wheel after a few nudges.
- I accidentally reversed the polarity on initially wiring up the lights and had not installed a fuse – this destroyed the motor controller and the throttle which I had to replace.
- I’ve had two subsequent thumb throttle control failures – one of which resulted in the throttle getting stuck on. Both I believe were related to moisture getting into the controller whilst leaving the bike parked in the rain.
- The key switch failed – again I believe as a result of moisture. In fairness would have been caused by my custom mount which faced the key switch up making it more prone to collecting water. Replacing this requires soldering.
- To keep water out of the new switch I glued a flap of old tyre tube to the battery to cover the switch.
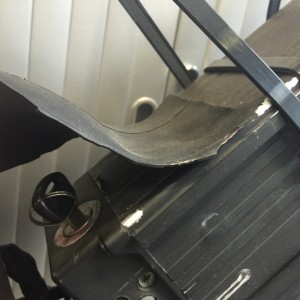
- To keep water out of the new switch I glued a flap of old tyre tube to the battery to cover the switch.
- I used the provided rack not for the battery but for my panniers which always carried less weight than the battery. The welds on the rack snapped within months. It’s clearly cheap/lightweight – I wouldn’t bother purchasing.

Tweaks:
- I installed a Cycle Analyst which I would highly recommend mostly because it gives you the detailed feedback about power consumption you need to be able plan your trips to make sure you don’t run out of power. To get the most out of the cycle analyst installation requires soldering connections.
- At first I couldn’t see a need for the cruise control but installed it regardless. It has proven very useful for merging in traffic – freeing up a hand to give hand signals without sudden changes to your speed.
- My original battery mounts failed. They allowed for too much movement and this eventually fatigued the metal. The second generation is holding up better and the battery no longer moves around over bumps.
- I installed a triple chainring on the front with the largest being 52 tooth. This lets you move your legs at a slower more comfortable rotation relative to the speed the motor will generate. I found a cassette with a smaller tooth count for the rear to further assist on this. Whilst I have batter power I only ever need to leave the highest gear climbing one very very steep hill on my route, the rest of the time I cruise in top gear with little effort. If the battery dies I can’t climb a hill in anything but the lowest gear (21 speed) and don’t go up many gears on the flat.
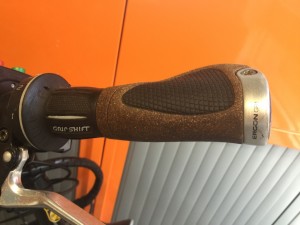
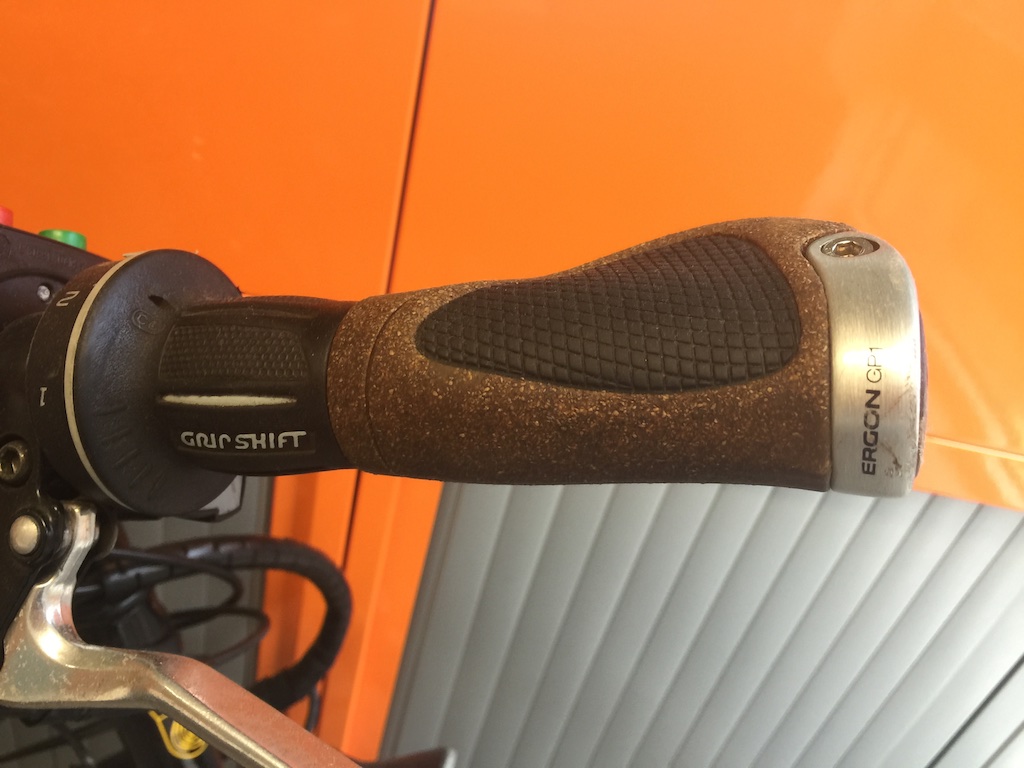
- I changed my gear shifters to grip shift, a) because the previous ones got in the way of the thumb throttle and b) since I used them so rarely the grip shifters were more out of the way.
- Replaced grips with Ergon GP1 Biocork for a more comfortable ride on my hands.
- I raised the handle bars with a taller stem (Pro, 90mm with 35degree rise) and stem extender (BBB BHP-22) for a more comfortable riding position. With a motor doing most of the work it’s still easy to ride in a more upright posture.
Performance:
- Over my route – per the graph above the Cycle Analyst tells me I’m consistently using 15 – 17 Wh/Km (lower than the calculated 20 Wh/Km above ) on an average speed of 25-30km/hr.
- I found no noticeable difference in battery life by connecting the regenerative braking and the Cycle Analyst is reporting it to be contributing circa 1%. It kicks in very suddenly so I’ve connected it only to the rear brake and use the front brakes for more fine braking control. I’m sure it’s reducing pad wear but that’s about all.
- A year in and into Winter (circa 15 degrees celsius I’m finding I can run out of battery power at 7.5Ah (out of a capacity of 10Ah) and just under the 20km mark on my route. The bike has spent 2 x 2 months periods unused over the year or so and I’m yet to determine if this is a fault or if it’s natural degradation of the battery.
- The motor has plenty of power and will happily run at 40km/hr on the flat. Most hills can be climbed at circa 25 km/hr with very gentle assistance.
- I’ve tried testing the effects on range by reducing top speed from 40 to 30 km/hr but didn’t see a huge difference. Small changes in how much I pedalled had a greater effect.
- For my normal route I do the return trip on a single charge, at home, over night. If I know I’m going to take a detour I charge at work as well to boost the range. Charging time has never been a concern (circa 3 hours).
In summary:
- Granted some of my faults have been of my own making but you should expect parts to fail, be prepared to spend time having your bike off the road whilst waiting for replacements and to be spending time fixing it.
- If you you’re not willing to pull apart the motor to replace controllers, solder parts, attach new connectors to wires, and tinker – I would not recommend buying this product.
- You really don’t want to run out of battery on your trips. There is a lot of resistance and a lot of weight to push when you have no power – pushing a 30 kg bike up a hill with the brakes on is hard work.
- When the kit works – it’s fantastic.
- The Magic Pie quickly convinced me I was going to be long term electric bike user, so taking into account the reliability problems I went looking for a more polished alternative even if at a higher price. I couldn’t find anything available in Australia that delivered a similar amount of power.
- UltraMotor’s A2B is a beautiful bike but nearly half the power and the company has had supply disruptions due to bankruptcy.
- eZee bike kit I’m told is more reliable but again a significantly lower power output.
- I test rode both of the above but decided the power difference too great.
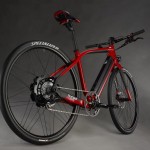
- The Specialized Turbo sounds amazing but it’s not available in Australia.
- The bike has completely replaced my walk/train commute and turned a 40 minute trip into a very enjoyable 25 minute one. I ride it in all weather. I can’t imagine not having an electric bike any more.
- For now I’m sticking with the Magic Pie and just accepting that it will continue to break every so often and replace the parts that do – the recent failures have all been relatively cheap fixes. When it works, it’s really fantastic.
Useful sites
- http://www.electricbikemag.co.uk/
- http://www.goldenmotor.com
- http://www.stealthelectricbikes.com.au/
- http://www.stromer.ch/
- http://glowwormbicycles.com.au/
Update June 2014
- The Specialized Turbo went on sale in Australia so I’ve now changed over to this. You can read my review on it.
- Since the last update I continued to experience parts failures – mostly caused by riding or leaving the bike out in the rain.
- My aluminium mounting brackets snapped, I built a new version using a wider section which lasted longer but still snapped. I replaced them with cable ties (1m long, rated to 80kg load via eBay) which worked very nicely.
- Very easy to install
- Easy to repair if one were to ever fail (they didn’t for me).
- Most significantly the original brackets had an annoying rattle which the cable tie mount didn’t have.